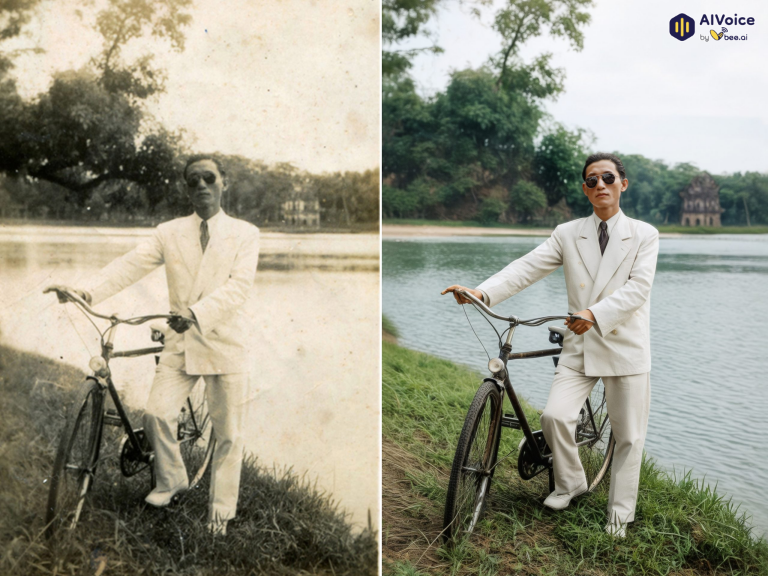
Nhờ sự phát triển vượt bậc của AI, việc phục chế ảnh cũ giờ đây trở nên nhanh chóng và đơn giản hơn bao giờ hết.Chỉ với một vài dòng mô tả, các công cụ AI như Gemini hay ChatGPT có thể phục chế và tái tạo ảnh cũ với độ sắc nét ấn tượng. Bài viết này sẽ tổng hợp các prompt phục chế ảnh hiệu quả nhất, giúp để bạn dễ dàng áp dụng ngay.
1. Vì sao nên dùng công cụ AI để phục chế ảnh?
Phục chế ảnh bằng AI đang trở thành xu hướng phổ biến trong năm 2025, không chỉ vì sự tiện lợi mà còn nhờ khả năng mang lại kết quả vượt trội so với các phương pháp truyền thống.
Điểm mạnh lớn nhất của AI nằm ở khả năng hiểu nội dung và bối cảnh hình ảnh. Công nghệ có thể tự động phát hiện khuôn mặt, ánh sáng, màu sắc, rồi tinh chỉnh từng chi tiết từ việc làm mịn da, xóa vết nứt, cho đến tô màu ảnh đen trắng một cách tự nhiên. Tất cả được thực hiện trong vài giây, nhanh hơn hàng chục lần so với chỉnh thủ công.
Bên cạnh đó, AI giúp tiết kiệm chi phí đáng kể. Người dùng không cần thuê chuyên gia phục chế hay đầu tư vào phần mềm đắt tiền. Mọi thao tác đều có thể thực hiện trực tiếp trên trình duyệt hoặc ứng dụng, phù hợp cho cả người mới lẫn những ai muốn phục hồi ảnh gia đình, ảnh kỷ niệm quý giá.
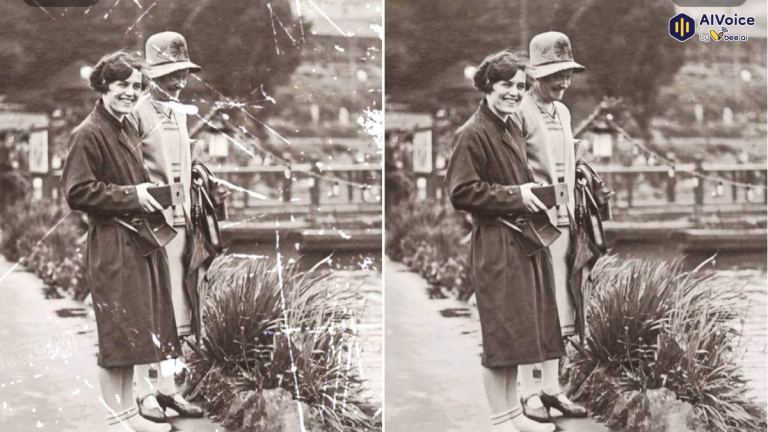
2. Tổng hợp prompt phục chế ảnh hiệu quả nhất
Trên đây là tổng hợp những prompt phục chế ảnh hiệu quả mà bạn có thể sao chép và áp dụng trực tiếp cho ảnh của mình. Mặc dù Gemini và ChatGPT đều hiểu tiếng Việt, nhưng viết prompt bằng tiếng Anh sẽ giúp AI xử lý chính xác và tự nhiên hơn.
2.1 Prompt cơ bản
Prompt 1:
Restore this photo using the following details: it was taken with a Leica M4-P camera, 35mm lens, and aperture f/4.0. Generate a color version of the image.
Prompt 2:
Restore the old photo by removing all stains, scratches, and discoloration. Make the image look new and clear, but keep the face, eyes, skin tone, and hairstyle 100% identical to the original. Maintain natural lighting and realistic texture.

2.2 Prompt nâng cao
Prompt 1
{
“version”: “1.0”,
“task”: “image_edit”,
“caption”: “Phục chế & nâng cấp ảnh cũ – giữ background gốc, màu điện ảnh, chuẩn Phase One XF IQ4 150MP”,
“notes”: “Biến ảnh cũ (kể cả ảnh chụp lại) thành ảnh màu hiện đại, sạch tuyệt đối, giữ background gốc nhưng nâng cấp đẳng cấp như chụp mới. Ưu tiên bảo toàn danh tính và pose.”,
“input_image”: “REPLACE_WITH_IMAGE_ID_OR_PATH”,
“preprocess”: {
“detect_and_isolate_original_photo”: true,
“auto_crop_photo_edges”: true,
“clean_edges”: true,
“remove_hands_or_objects”: true,
“perspective_correction”: true,
“flatten_page_curvature”: true,
“glare_reduction”: “strict”,
“reflection_removal”: “strict”,
“specular_highlight_fix”: true
},
“camera_emulation”: {
“brand_model”: “Phase One XF IQ4 150MP”,
“lens”: “Schneider Kreuznach 80mm LS f/2.8”,
“medium_format”: true,
“look”: “ultimate sharpness, maximum dynamic range, medium format 3D pop, cinematic rendering”
},
“composition”: {
“framing”: “three-quarter body (from mid-thigh up)”,
“orientation”: “portrait”,
“crop_policy”: “do_not_crop_face_or_hands”,
“keep_pose”: true,
“zoom”: “slight zoom-out for wider context”
},
“subject_constraints”: {
“keep_identity”: true,
“lock_features”: [“eyes”,”nose”,”lips”,”eyebrows”,”jawline”,”face_shape”,”ears”,”hairline”],
“expression_policy”: “preserve_original”
},
“retouching”: {
“skin”: {
“tone”: “realistic warm neutral”,
“finish”: “radiant but detailed”,
“texture”: “retain fine pores; avoid plastic look”,
“blemishes”: “remove completely”,
“luminosity_balance”: “uniform subtle glow”,
“color_uniformity”: “fix uneven tones”
},
“hair”: { “finish”: “clean, neat, natural gloss”, “flyaways”: “reduce but keep natural strands” },
“eyes”: {
“iris_color”: “natural brown/gray”,
“whites_desaturation”: 0.1,
“iris_clarity”: 0.2,
“avoid_overwhitening”: true,
“avoid_exaggeration”: true
},
“teeth”: { “natural_whiten”: 0.08, “avoid_pure_white”: true },
“clothing”: {
“fabric_look”: “premium, fine weave, crisp edges”,
“wrinkle_reduction”: “moderate”,
“texture_enhancement”: 0.25
},
“repair_cracks”: “strict”,
“remove_dust_scratches”: “strict”,
“remove_stains”: “strict”,
“remove_folds”: true,
“restore_faded_details”: true
},
“colorization”: {
“apply_to”: “entire_photo”,
“style”: “cinematic, natural, true-to-life”,
“skin_tone_accuracy”: “very_high”,
“background_colorization”: “full, layered, realistic”,
“clothing_colorization”: “faithful but premium”,
“avoid_exaggeration”: true
},
“background”: {
“policy”: “preserve_and_enhance”,
“keep_original”: true,
“enhancement”: {
“colorize”: “natural, true-to-life, cinematic color grading”,
“restore_damage”: true,
“texture_cleanup”: “remove paper grain and speckles completely”,
“add_depth”: “studio gradient with layered tones and soft atmospheric haze”,
“contrast_boost”: “medium-high with soft roll-off”,
“dynamic_range”: “expanded like medium format”,
“lighting_match”: true
},
“remove_external_objects”: true,
“banding_fix_on_background”: true
},
“color_tone”: {
“overall”: “natural, true-to-life”,
“saturation”: “balanced vivid”,
“contrast”: “medium with cinematic roll-off”,
“vibrance”: 0.2,
“color_restoration”: “revive faded colors, unify uneven tones, remove discoloration completely”,
“auto_tone_balance”: “strict”,
“auto_contrast_balance”: true,
“recolorize_consistently”: true
},
“detail_sharpness”: {
“method”: “edge-aware sharpening”,
“amount”: 0.4,
“radius”: 0.9,
“threshold”: 0.02,
“noise_reduction”: { “luminance”: 0.22, “chroma”: 0.26, “preserve_details”: 0.85 }
},
“clean_up”: {
“remove_noise”: true,
“remove_artifacts”: true,
“remove_scratches”: “strict”,
“remove_dust”: “strict”,
“remove_stains”: “strict”,
“remove_folds”: true,
“deblotching”: true,
“desilvering_fix”: true,
“paper_texture_reduction”: “strong”,
“restore_faded_colors”: true,
“reconstruct_missing_parts”: “museum-grade”,
“reconstruct_missing_corners”: true,
“hallucination_control”: “only realistic restoration, no fantasy”,
“heritage_preservation_strict”: true,
“archival_quality”: “museum-grade restoration, pristine finish”,
“final_finish”: “as new color studio photograph, indistinguishable from modern digital capture”
},
“controls”: {
“face_identity_lock”: 0.96,
“pose_lock”: 0.95,
“background_enhancement_strength”: 0.9,
“colorization_strength”: 0.9,
“restoration_strength”: 0.95,
“background_replace_strength”: 0.0
},
“output”: {
“resolution”: “12000×8000”,
“dpi”: 600,
“format”: “TIFF”,
“color_space”: “AdobeRGB 1998”,
“bit_depth”: “16-bit”,
“background_alpha”: “opaque”
},
“safety_bounds”: {
“do_not”: [
“change face geometry or identity”,
“change pose”,
“alter clothing style drastically”,
“add heavy makeup”,
“over-smooth or plastic skin”,
“over-sharpen halos”,
“exaggerated eye colors”
],
“negative_prompt”: [
“paper grain”,
“speckles”,
“flat monochrome background”,
“hands holding photo”,
“photo edges visible”,
“glare spots”,
“crooked perspective”,
“color casts”,
“posterization/banding”,
“muddy blacks”,
“oversaturated skin”,
“cartoonish colors”,
“loss of fine texture”,
“visible damage marks”
]},
“seed”: 142857,
“metadata”: {
“locale”: “vi-VN”,
“creator”: “fine art restoration specialist”,
“purpose”: “phục chế & nâng cấp toàn ảnh lên chuẩn studio hiện đại, giữ nền gốc nhưng nâng cấp màu/độ sâu/dải sáng”,
“workflow”: “studio emulation, medium format rendering, heritage restoration, cinematic color grading”
}
}
Prompt 2
“version”: “1.0”,
“task”: “image_edit”,
“notes”: “Edit foto menjadi potret studio kelas profesional setara Canon EOS R5. Pertahankan wajah & pose asli.”,
“input_image”: “REPLACE_WITH_IMAGE_ID_OR_PATH”,
“camera_emulation”: {
“brand_model”: “Canon EOS R5”,
“lens”: “50mm f/1.8 (standard prime, sedikit lebih luas dari 85mm)”,
“look”: “ultra sharp, rich micro-contrast, natural color science”
},
“composition”: {
“framing”: “three-quarter body (from mid-thigh up)”,
“arms”: “both arms sepenuhnya terlihat”,
“orientation”: “portrait”,
“crop_policy”: “do_not_crop_face_or_hands”,
“keep_pose”: true,
“zoom”: “slight zoom-out for wider context”
},
“subject_constraints”: {
“keep_identity”: true,
“lock_features”: [“eyes”, “nose”, “lips”, “eyebrows”, “jawline”, “face_shape”],
“expression_policy”: “preserve_original”
},
“retouching”: {
“skin”: {
“tone”: “keep original color”,
“finish”: “smooth, healthy, radiant”,
“texture”: “retain fine pores; avoid plastic look”,
“blemishes”: “lightly reduce temporary blemishes only”,
“frequency_separation_strength”: 0.4,
“clarity_microcontrast”: 0.15
},
“hair”: {
“finish”: “clean, neat, shiny”,
“flyaways”: “reduce but keep natural strands”
},
“eyes”: {
“whites_desaturation”: 0.1,
“iris_clarity”: 0.2,
“avoid_overwhitening”: true
},
“teeth”: {
“natural_whiten”: 0.08,
“avoid_pure_white”: true
},
“clothing”: {
“policy”: “upgrade quality while keeping same/similar style, cut, and color”,
“fabric_look”: “premium, fine weave, crisp edges”,
“wrinkle_reduction”: “moderate”,
“texture_enhancement”: 0.2
},
“lighting”: {
“setup”: “bright, soft, even front light”,
“key”: “beauty dish or ring light straight-on”,
“fill”: “broad soft fill to remove harsh shadows”,
“shadow_control”: “minimal, no deep shadows”,
“specular_highlights”: “subtle, flattering”,
“white_balance”: “neutral daylight”,
“exposure_target”: “ETTR without clipping”
},
“background”: {
“type”: “solid”,
“color”: “navy blue (#0f2a4a)”,
“environment”: “clean professional photo studio”,
“gradient”: “very subtle center vignette”,
“separation”: “gentle rim lift if needed”
},
“color_tone”: {
“overall”: “natural, true-to-life skin tones”,
“saturation”: “moderate”,
“contrast”: “medium with soft roll-off”,
“vibrance”: 0.1
},
“detail_sharpness”: {
“method”: “edge-aware sharpening”,
“amount”: 0.35,
“radius”: 0.8,
“threshold”: 0.02,
“noise_reduction”: {
“luminance”: 0.2,
“chroma”: 0.25,
“preserve_details”: 0.8
},
“clean_up”: {
“remove_noise”: true,
“remove_artifacts”: true,
“banding_fix_on_background”: true
“output”: {
“resolution”: “6000×4000”,
“dpi”: 300,
“format”: “PNG”,
“color_space”: “sRGB IEC61966-2.1”,
“bit_depth”: “16-bit if supported, else 8-bit”,
“background_alpha”: “opaque”
“safety_bounds”: {
“do_not”: [
“change face geometry or identity”,
“change pose”,
“alter clothing style drastically”,
“add heavy makeup”,
“over-smooth or plastic skin”,
“over-sharpen halos
“negative_prompt”: [
“plastic skin”,
“over-whitened eyes/teeth”,
“harsh shadows”,
“color casts”,
“halo artifacts”,
“muddy blacks”,
“posterization/banding”,
“oversaturated skin”,
“blotchy NR”
“face_identity_lock”: 0.95,
“pose_lock”: 0.95,
“background_replace_strength”: 0.9,
“clothes_style_lock”: 0.85
},
“seed”: 142857,
“metadata”: {
“locale”: “id-ID”,
“creator”: “professional photo editor style”,
“purpose”: “masterpiece studio portrait upgrade with zoom-out framing”
Prompt 3
Restore & Enhance Old Photos (including re-photographed ones) into modern, high-quality color portraits — preserving the original background and the subject’s true identity.
The final result should look as if it were taken with a Phase One XF IQ4 150MP camera — ultra-sharp, rich in detail, cinematic color tone, and wide dynamic range.
Detailed Requirements
Pre-processing:
Crop edges, straighten frame, remove handheld objects, flatten photo, reduce glare and reflection, clean dust/scratches/folds, and recover faded details.
Subject:
Keep the original pose and facial structure — do not alter features (eyes, nose, lips, eyebrows, jawline, hair). Skin should look evenly toned, clean, natural, with visible pores — avoid “plastic skin.”
Hair, Eyes, Teeth:
Hair neat with soft shine; eyes clear but natural (not overly white); teeth moderately white.
Clothing:
Fabric should appear sharp, slightly de-wrinkled, and premium-looking.
Color:
Recreate authentic, cinematic colors with accurate skin tones — no oversaturation or color blotching.
Background:
Preserve the original background, restore cleanliness, remove grain, enhance depth using soft gradient and balanced lighting.
Technical:
Use edge-aware sharpening, noise reduction that preserves detail, expanded dynamic range — avoid oversharpening or fake colors.
Final Output:
Modern studio-quality portrait in TIFF 16-bit, 12000×8000, 600 dpi, AdobeRGB 1998, preserving authenticity as if newly photographed.
Prohibited:
No pose change, no heavy makeup, no plastic skin, no wardrobe style changes, no overly colored eyes or excessively saturated skin tones.
2.3 Prompt phục chế ảnh theo mục đích sử dụng
Dưới đây là bảng tổng hợp các prompt gợi ý theo từng mục đích sử dụng, giúp bạn dễ dàng áp dụng khi làm việc với các công cụ AI như Gemini, ChatGPT hay Midjourney.
| Phục chế cơ bản, loại bỏ vết xước | “Restore this old photo by removing scratches, dust, and damage. Improve clarity while maintaining original character.” |
| Thêm màu tự nhiên cho ảnh đen trắng | “Colorize this black-and-white photo using natural skin tones, soft clothing colors, and period-accurate background.” |
| Sửa hư hỏng nặng | “Restore this damaged photograph by repairing scratches, folds, discoloration, and missing details. Then colorize with realistic tones.” |
| Nâng độ phân giải | “Upscale this faded photo to 4K resolution with natural skin tones, sharpen details in eyes and hair, maintain historical accuracy.” |
| Giữ phong cách gốc | “Restore this vintage photo to fresh state, colorize, soft diffuse lighting, preserve imperfections for authenticity.” |
| Sửa nền và ánh sáng | “Repair this old family photo, remove scratches, enhance background with soft natural light, colorize naturally.” |
| Phục chế ảnh phim | “Restore this old negative film photo: convert to color, upscale, maintain original grain and tones.” |
| Làm nét chi tiết cụ thể | “Enhance the texture of the stone wall to make it sharper” hoặc “Emphasize the fine lines in the fabric.” |
3. Hướng dẫn chi tiết cách phục chế ảnh bằng Gemini
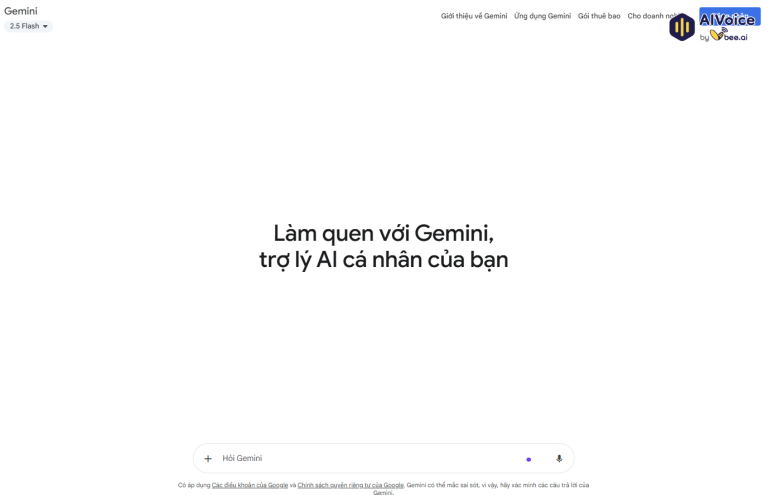
Bước 1: Truy cập nền tảng Gemini
Mở trình duyệt và truy cập Google AI Studio hoặc Gemini trên web, app. Đây là nơi bạn có thể sử dụng các mô hình AI của Google để tạo hoặc phục chế hình ảnh.
Bước 2: Đăng nhập tài khoản Google
Chọn Đăng nhập (Sign in) hoặc Đăng ký (Sign up) nếu bạn chưa có tài khoản.
Việc đăng nhập giúp lưu lại lịch sử xử lý và truy cập đầy đủ các tính năng của Gemini.
Bước 3: Tải lên ảnh cần phục chế
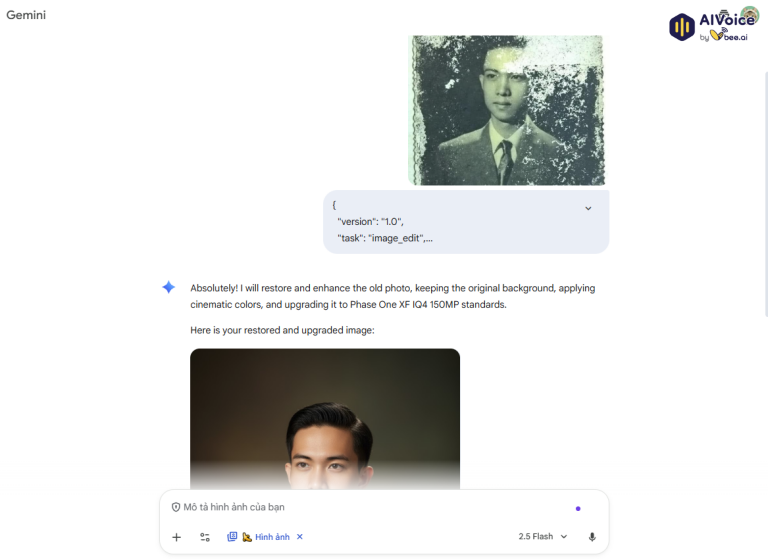
Nhấn dấu “+” (Thêm tệp) để tải lên bức ảnh cũ, ảnh mờ hoặc ảnh phai màu mà bạn muốn khôi phục. Sau khi tải lên, chọn chế độ “Tạo hình ảnh bằng Imagen” (Generate image using Imagen) để Gemini nhận diện và sẵn sàng xử lý ảnh.

Bước 4: Nhập prompt phục chế ảnh
Tại khung nhập văn bản, gõ prompt phục chế như đã gợi ý bên trên. Chờ trong vài giây để Gemini tiến hành phân tích, làm sạch và phục hồi chi tiết ảnh.
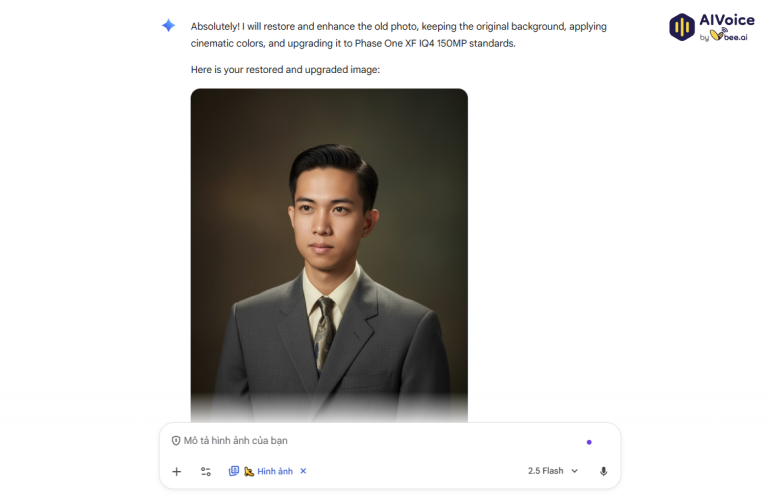
Bước 5: Xem và tải kết quả
Sau khi xử lý xong, Gemini sẽ hiển thị ảnh đã được phục chế ngay trên màn hình. Bạn có thể so sánh với bản gốc, điều chỉnh thêm nếu muốn, rồi tải ảnh hoàn thiện về máy để lưu trữ hoặc chia sẻ.
4. Những lưu ý khi phục chế ảnh bằng AI
- Khi bắt đầu phục chế, bạn nên xác định rõ mục tiêu chẳng hạn như lưu giữ kỷ niệm, in ấn hay phục hồi tư liệu lịch sử để chọn mức độ can thiệp phù hợp và tránh làm sai lệch bản gốc.
- Bạn cần chọn đúng công cụ AI cho mục đích sử dụng của mình. Ví dụ, Remini phù hợp để phục hồi khuôn mặt, Topaz Photo AI giúp tăng độ phân giải và giảm nhiễu, trong khi Gemini, ChatGPT cho phép nhập prompt chi tiết để tùy chỉnh kết quả.
- Hãy viết prompt mô tả rõ ràng và cụ thể, bao gồm thông tin về nguồn ảnh, mục tiêu phục chế và phong cách mong muốn.
- Bạn không nên lạm dụng các tính năng làm đẹp hoặc làm mờ vì AI có thể tự “bịa” thêm chi tiết hoặc làm sai khuôn mặt, khiến bức ảnh mất đi tính chân thực.
- Trong quá trình phục chế ảnh màu, bạn cần giữ màu sắc trung thực, tham khảo màu gốc hoặc tư liệu cùng thời để tránh việc AI tô sai màu da, quần áo hay bối cảnh.
- Bạn nên luôn lưu giữ bản gốc của bức ảnh, đồng thời tạo nhiều phiên bản phục chế khác nhau để dễ so sánh và lựa chọn.
- Cuối cùng, hãy xuất ảnh đúng định dạng để đạt chất lượng tốt nhất: dùng .TIFF hoặc .PNG (300–600 DPI) khi in ấn, và .JPG chất lượng cao (từ 90% trở lên) khi lưu trữ hoặc chia sẻ trực tuyến.
5. Một số câu hỏi thường gặp
5.1 Phục chế ảnh bằng AI là gì?
Phục chế ảnh bằng AI là quá trình sử dụng trí tuệ nhân tạo để khôi phục, làm rõ, hoặc tô màu lại các bức ảnh cũ, mờ, bị xước hoặc hư hại. AI sẽ tự động phân tích và tái tạo chi tiết dựa trên dữ liệu hình ảnh gốc.
5.2 Làm sao để ảnh phục chế trông tự nhiên, không bị “giả”?
Bạn nên tránh dùng các prompt hoặc công cụ chỉnh sửa quá mạnh. Hãy yêu cầu AI giữ nguyên chi tiết gốc và tăng chất lượng vừa phải, thay vì làm mịn da hoặc thay đổi khuôn mặt.
5.3 Gemini và ChatGPT khác nhau thế nào khi phục chế ảnh?
- Gemini có giao diện trực quan, dễ thao tác với ảnh, phù hợp người mới bắt đầu.
- ChatGPT cho phép bạn mô tả kỹ hơn bằng prompt, kiểm soát chi tiết hơn và có thể kết hợp với chỉnh sửa thủ công.
5.4 Có thể phục chế ảnh màu bị phai bằng AI không?
Có. AI có thể khôi phục và tô lại màu cho ảnh bị phai hoặc ảnh đen trắng. Tuy nhiên, bạn nên mô tả rõ phong cách màu muốn giữ lại để tránh sai lệch màu sắc.
5.5 AI có thể phục chế hoàn toàn khuôn mặt bị mất chi tiết không?
AI có thể ước lượng và tái tạo khuôn mặt dựa trên dữ liệu còn lại, nhưng không thể khôi phục chính xác 100%. Với ảnh tư liệu quan trọng, nên đối chiếu thêm ảnh gốc khác của cùng người để tăng độ chính xác.
Phục chế ảnh bằng AI không chỉ là cách làm sống lại những khoảnh khắc đã phai mờ, mà còn là cầu nối giữa quá khứ và hiện tại. Với những công cụ mạnh mẽ như Gemini hay ChatGPT, bất kỳ ai cũng có thể tự tay tái tạo lại bức ảnh cũ của mình một cách dễ dàng và chân thực. Hy vọng rằng qua bài viết này, bạn đã có thêm những gợi ý hữu ích về cách viết prompt và lựa chọn công cụ phù hợp để phục chế ảnh hiệu quả.

